なにか作ったので公開しておきましょう。
なにがしたいの
開発、本番環境いかんに関わらず、 GitHub -> CI -> デプロイという流れがあります。*1
ただし、プロジェクトを跨いでいてもCIにgitクローン結果を残したくないというのがあります。で、CIを使わず自動でgit -> git -> gitをしたいなと。
今回公開するモジュールは、PowerShellモジュールによるCIの簡易モジュールです。
どう使うの
前提
- 認証処理をクリアするため
valentiaを用いているため、valentiaのインストールが必要 gitをインストール
実行
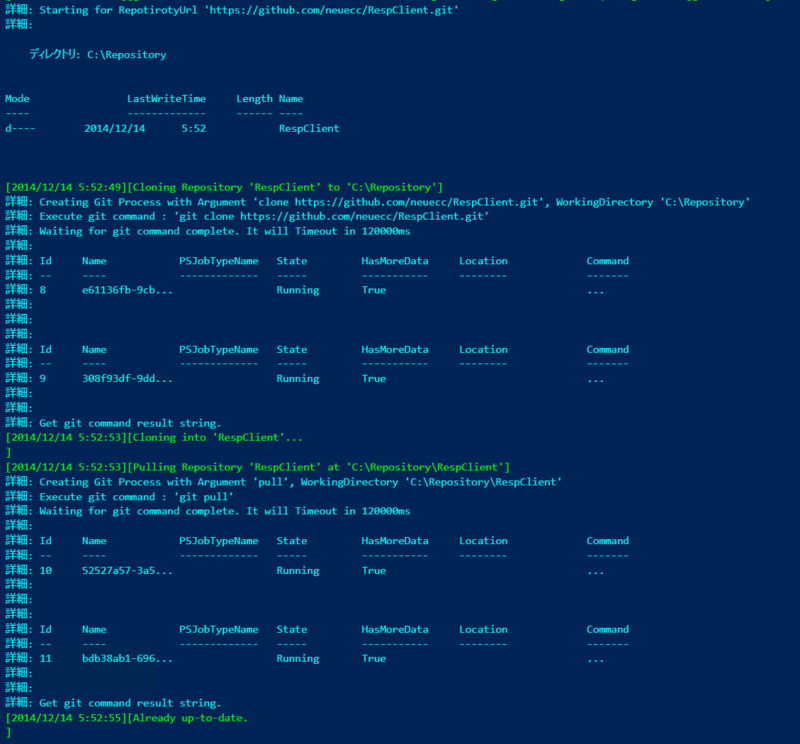
初めて使うところから、自動化するとこんな感じで。例としてRespClientをClone -> Pullしてみましょう。
実行している様子
実行するとこんな感じで、 valentiaとGitContinuousPullモジュールを自動ダウンロード、Git認証情報をWindows Credential Managerに入れようとします。
- コードでは、前提のvalentiaインストールを含む
- コードでは、前提のGitContinousPullインストールを含む
ここからがGitContinuousPullの機能
認証情報を求められたら、GitHubのユーザー名、パスワードを入れてください。
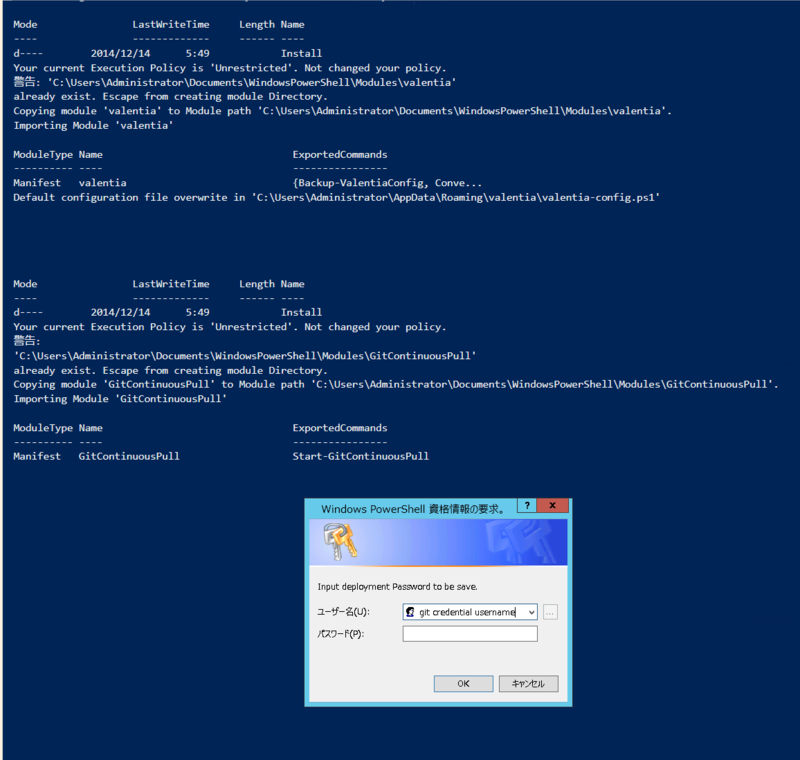
これで、次回以降は自動的にGitHubの認証が配置、自動復旧されます。

あとは、CloneとPullが走って、PostActionに設定したコマンドが実行できます。
他の利用例
単純にGit環境の構築にも便利なわけで。イケメンさんとか使ったみたいです。
https://goodbyeboredworld.hatenablog.com/entry/2014/12/11/103830
あとは、CIの認証が吹き飛んだ時の自動復旧に使えたりとか。ね。
何ができるの
単純です。
- Git認証情報の自動修復
- GitリポジトリのClone/Pull
- Pull後のカスタムスクリプト実行
つまり、簡易CIですね。
ヘルプ
使えるコマンドは1つだけです。
$ Start-GitContinuousPull --help

NAME
    Start-GitContinuousPull

SYNOPSIS
    Git Automation simple module for both private/public respository.

SYNTAX
    Start-GitContinuousPull [-RepositoryUrl] <Uri> [-GitPath] <String> [[-LogFolderPath] <String>] [[-LogName] <String>
    ] [[-PostAction] <ScriptBlock[]>] [<CommonParameters>]


DESCRIPTION
    You can automate git clone -> pull -> PostAction with simple definition.
    This would be usefull to temporary continuous execution without CI.

    Make sure you have don Prerequisites.
        1. You need to install git.
        2. Set git-credential-wincred as a Credential helper.
        3. Set your git password to Windows Credential Manager as TargetName : git

    See NOTES for the details.


PARAMETERS
    -RepositoryUrl <Uri>

        Required?                    true
        Position?                    1
        Default value
        Accept pipeline input?       true (ByValue, ByPropertyName)
        Accept wildcard characters?  false

    -GitPath <String>

        Required?                    true
        Position?                    2
        Default value
        Accept pipeline input?       true (ByValue, ByPropertyName)
        Accept wildcard characters?  false

    -LogFolderPath <String>

        Required?                    false
        Position?                    3
        Default value
        Accept pipeline input?       true (ByValue, ByPropertyName)
        Accept wildcard characters?  false

    -LogName <String>

        Required?                    false
        Position?                    4
        Default value
        Accept pipeline input?       true (ByValue, ByPropertyName)
        Accept wildcard characters?  false

    -PostAction <ScriptBlock[]>

        Required?                    false
        Position?                    5
        Default value
        Accept pipeline input?       true (ByValue, ByPropertyName)
        Accept wildcard characters?  false

    <CommonParameters>
        This cmdlet supports the common parameters: Verbose, Debug,
        ErrorAction, ErrorVariable, WarningAction, WarningVariable,
        OutBuffer, PipelineVariable, and OutVariable. For more information, see
        about_CommonParameters (https://go.microsoft.com/fwlink/?LinkID=113216).

INPUTS

OUTPUTS
    System.String[]


NOTES


        # 1. Install git. You may find it by Chocolatey, Git for Windows, SourceTree or other git tools. Below is sampl
        e to install git through chocolatey.
        cinst git

        # 2. Run this to add git-credential-wincred into .gitconfig.
        # set git-credential-wincred into .girhub. Now git.exe read github credential from Windows Credential Manager.
        git config --global credential.helper wincred

        # 3. You need to set git credential into Credential Manager as name : git
        # set your github authenticated user/password
        Set-ValentiaCredential -TargetName git

    -------------------------- EXAMPLE 1 --------------------------

    PS C:\>Import-Module GitContinuousPull


    $param = @(
        @{
            RepositoryUrl = "https://github.com/guitarrapc/valentia.git"
            GitPath = "C:\Repository"
            LogFolderPath = "C:\logs\GitContinuousPull"
            LogName = "valentia-{0}.log" -f (Get-Date).ToString("yyyyMMdd-HHmmss")
            PostAction = {PowerShell -File "C:\Repository\valentia\valentia\Tools\install.ps1"}
        }
    )
    $param | %{Start-GitContinuousPull @_ -Verbose}
    # this will clone valentia into C:\Repository\valentia and pull it to the latest commit.

RELATED LINKS
流れだけさくっと。
Git認証情報の自動修復
HTTPSの場合だけなんですが、Windowsでsshが相性わるいんですよにぇ。しょーがないHTTPS決め打ちにゃ。
どういうことかというと、git-credential-winstore.exeやgit-credential-winstore.exeが主に利用されるでしょうが、どっちを使ってもGitHub認証情報が吹き飛びます。主に、Gitプロセスが壊れたりすると認証情報も吹っ飛ぶます。
WindowsでGitHubを使ってるとおそらく誰もが経験したことあるのではないでしょうか?
本モジュールでは、 git-credential-wincredを.gitconfig上でhelperとして規定しています。
git config --global credential.helper wincred
これにより、git:https://GitHubUserName@github.comでWindows認証マネージャーに設定されている認証情報が、git:https://GitHubUserName@github.comなどで自動的に利用されます。
本モジュールでは、gitという名称で別にWindows認証マネージャーに認証情報を設定しています。これにより、gitがもし吹き飛んでいた場合は自動補完してくれます。
GitリポジトリのClone/Pull
リポジトリに対して、HTTPSで接続するので、RepositoryUrlはhttps://github.com/neuecc/RespClient.gitのようにhttps://github.com/neuecc/RespClient.gitが末尾につきます。
このリポジトリをGitPathにCloneします。
もし同名フォルダなどがあって、Clone済みとみなされる場合はスキップされます。
で、続いてPullが試みられます。
Pull後のカスタムスクリプト実行
Clone/Pullが正常に終わってら、PostActionに指定した内容が実行されます。
実行条件は2つ
- 初Clone
- Pullで更新が検知された場合
この条件の場合に自動実行されます。
自動化
タスクスケジューラでいいですかね。
スケジュールをスクリプトで組む
valentiaと連携することで容易に可能です。valentiaのWikiに詳細書いてあるのでどうぞ。*2
https://github.com/guitarrapc/valentia/wiki/TaskScheduler-Automation
https://github.com/guitarrapc/valentia/wiki/TaskScheduler-Automation
DSC でスケジュールを組む
DSCでも可能ですよ? この辺のサンプルをどうぞ。
https://github.com/guitarrapc/DSCResources/tree/master/Custom/GraniResource
まとめ
ActiveDirectoryとかの構築、運用とか全部コードに落として自動化されてるんですが、そういうコードってCIほしいけど、Jenkinsだとやりすぎ感がちょっと。
でも、GitHubにPushしたら、即反映させたい。GitContinousPullモジュールを使うとPushするだけですから楽です。