GitHub ActionsでOpenID Connectを経由して各種Cloud Providerの認証を得る機能のがGAしました。 めでたい。
これにより、aws-actions/configure-aws-credentialsのみで認証が組めるようになったので見てみましょう。
https://github.com/marketplace/actions/configure-aws-credentials-action-for-GitHub-actions
概要
- GitHub ActionsでAWS操作をするために、IAM Userが不要になるので神
- セルフホストなGitHub ActionsをEC2で動かしているなら、素直にInstance Roleを使うので十分というのもある。(何か事情があればOpenId Connectorでもいい)
- AWSアカウントでOpenId Connect Providerは一意。1 AWSアカウントで複数環境を持っている & 環境ごとにIAM Roleを持っている場合は、環境ごとにOpenId Conect Providerを作ろうとして失敗しないように
- 並列度高く認証を取得しようとすると失敗することが多いので注意
動作例
設定がただしければ、必要なIAM Role Arnをrole-to-assumeに指定するだけで、そのRole権限で操作ができるようになります。
これで
      - name: Configure AWS Credentials
        uses: aws-actions/configure-aws-credentials@master
        with:
          aws-region: ap-northeast-1
          role-to-assume: "作ったIAM Role の Arn を入れる"
          role-session-name: "適当な名前"
こうなる。

基本
GitHubから公式にドキュメントが公開されたのでこれに従いましょう。先日までuses: aws-actions/configure-aws-credentials@v1になってたせいでドキュメントが嘘つきでしたが@masterに修正されています。
なお、https://github.com/aws-actions/configure-aws-credentialsは、uses: aws-actions/configure-aws-credentials@v1になっているので動きません。uses: aws-actions/configure-aws-credentials@masterに読み替えましょう。
Terraform で AWSを用意する。
用意する必要があるのは、OIDC ProviderとIAM Roleです。
- OIDC Providerは、GitHub OIDCと信頼関係を結ぶのに必要
- IAM RoleはOIDC Provider経由でGitHub OIDCからリクエストされたときに、
リクエスト元のリポジトリオーナー/リポジトリ名:ブランチ名を検証し条件にマッチしたらそのRoleをAssumeして利用する。つまり、このRoleに、リポジトリの制約と必要なIAM Policyを振ればok
全体を示します。
https://gist.github.com/guitarrapc/0047b71d6659eceb7b4f91c5c7371226
OIDC Provider を用意する
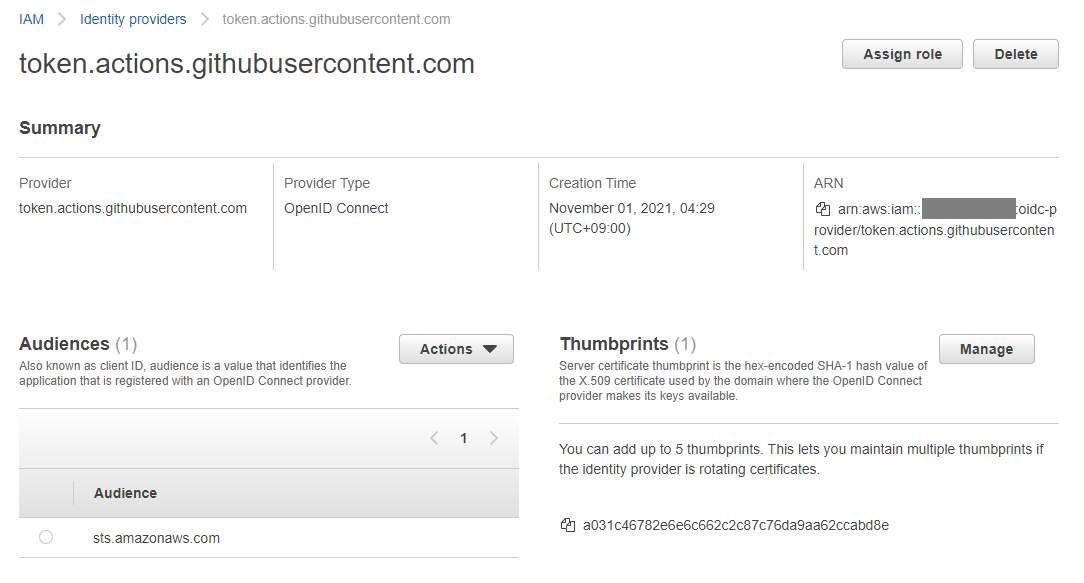
値は固定なので単純です。terraformならこうなります。
// oidc provider
resource "aws_iam_openid_connect_provider" "main" {
  url             = "https://token.actions.githubusercontent.com"
  client_id_list  = ["sts.amazonaws.com"]
  thumbprint_list = ["a031c46782e6e6c662c2c87c76da9aa62ccabd8e", "6938fd4d98bab03faadb97b34396831e3780aea1"] // 2022/1/11 に 中間証明書更新された
}
thumbprintに関しては中間証明書の寿命が1年なので、毎年1/11に代わっていくはずです。 thumbprintはコマンドでとれるので、更新直後などドキュメントが間に合ってないときは適当に対応しましょう。
https://gist.github.com/guitarrapc/8e6b68f21bc1eef8e7b66bde477d5859
client_id_listがGA前と後で変わっています。古いバージョンではここで、リクエスト元のリポジトリURLを指定していましたが、今はsts.amazonaws.comといつものになりました。標準に沿ってくれてよかった。
GitHubのEndpointが確認できますね。
https://token.actions.githubusercontent.com/.well-known/openid-configuration
{"issuer":"https://token.actions.githubusercontent.com","jwks_uri":"https://token.actions.githubusercontent.com/.well-known/jwks","subject_types_supported":["public","pairwise"],"response_types_supported":["id_token"],"claims_supported":["sub","aud","exp","iat","iss","jti","nbf","ref","repository","repository_owner","run_id","run_number","run_attempt","actor","workflow","head_ref","base_ref","event_name","ref_type","environment","job_workflow_ref"],"id_token_signing_alg_values_supported":["RS256"],"scopes_supported":["openid"]}
IAM Role を用意する
順番に解説します。
重要なのは、Assume Roleです。 Assume RoleでOIDC Providerからのリクエストを検証しています。
- principalは、認証を委譲されて受けるので
type: "Federated"+ 先ほど作ったOIDC Providerのarnを指定 - conditionで、リクエスト元が
repo:<GitHubOwner>/<Repositry>:Branchの条件とマッチするか検証
OIDC経由で、許可した「リポジトリ、かつブランチ」だった場合にIAM Roleをsts:AssumeRoleWithWebIdentityとしてAssumeできるようにします。
さて、複数のリポジトリで同じロールを使いたいケースはどうすればいいでしょうか?
IAM Policyのconditionは、ワイルドカード一致するかをStringLikeで検証できますが、これはvalueが1要素 (=単一リポジトリ) のときにしか機能しません。
valueが複数要素(=複数リポジトリ)でもワイルドカードで一致するかを見る場合は、ForAnyValue: + StringLikeを用います。
今回は分岐させましたが、別にForAnyValueで初めから書いてもいいでしょう。
data "aws_iam_policy_document" "github_oid_assume_role_policy" {
  statement {
    effect  = "Allow"
    actions = ["sts:AssumeRoleWithWebIdentity"]
    principals {
      type        = "Federated"
      identifiers = [aws_iam_openid_connect_provider.main.arn]
    }
    # aud があるとはじかれてるので、aud の値がおかしいっぽい。 aws-actions/configure-aws-credentials の仕組みからすると、sts.amazonaws.com が来るはず。 <- github.com/aws-actions/configure-aws-credentials ではなしになってる :(
    # condition {
    #   test     = "StringEquals"
    #   variable = "token.actions.githubusercontent.com:aud"
    #   values   = ["https://github.com/${var.github_owner}"]
    # }
    condition {
      test     = length(var.github_oidc_repo_names) == 1 ? "StringLike" : "ForAnyValue:StringLike"
      variable = "token.actions.githubusercontent.com:sub"
      values   = [for item in var.github_oidc_repo_names : "repo:${var.github_owner}/${item}:*"]
    }
  }
}
AssumeRoleができてしまえばIAM Roleを作るだけです。今回は、aws sts get-caller-identityを実行できるようにしてみましょう。
特にいうことはないですね。終わり。
data "aws_iam_policy_document" "github_actions" {
  // allow running `aws sts get-caller-identity`
  statement {
    effect    = "Allow"
    actions   = ["sts:GetCallerIdentity"]
    resources = ["*"]
  }
}

resource "aws_iam_policy" "github_actions" {
  name        = "githubactions_policy"
  path        = "/"
  description = "Policy for GitHubActions"
  policy      = data.aws_iam_policy_document.github_actions.json
}
resource "aws_iam_role" "test_role" {
  name               = "githubactions-oidc-role"
  path               = "/"
  assume_role_policy = data.aws_iam_policy_document.github_oid_assume_role_policy.json
  policy_arns = [
    aws_iam_policy.github_actions.arn
  ]
}
リソースを作成
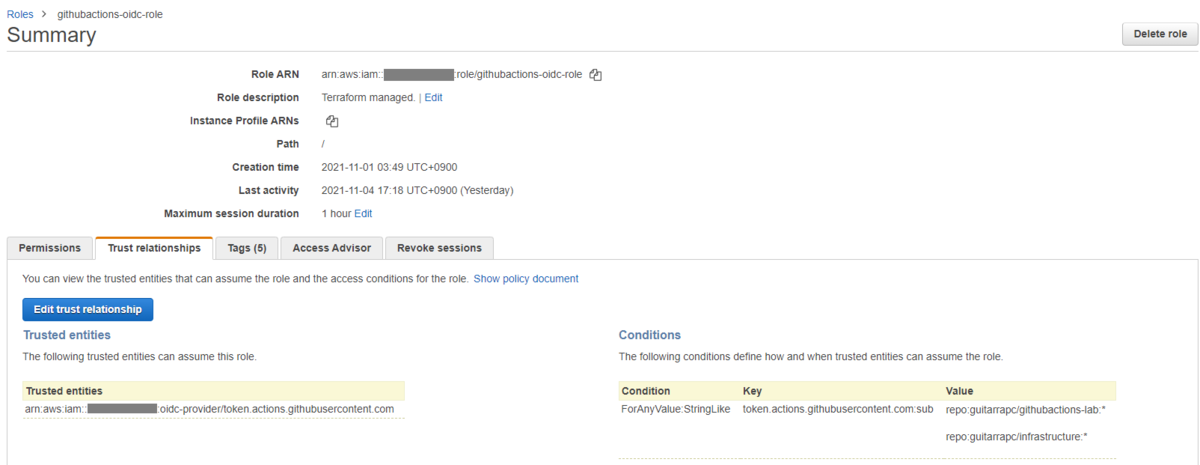
さて、これでAWSにリソースを作るとこんな感じになります。
今回は、guitarrapc/githubactions-labとguitarrapc/infrastructureの2リポジトリからGitHub Actions経由で認証を受けられるようにしました。
IAM RoleのTrust relationships > Conditionsで2リポジトリがForAnyValue:StringLikeで指定されているのがわかりますね。


ここまでのどれかにミスがあるとAssume Roleされません。 うまくいかない場合は何度も見直すことになるでしょう。
GitHub Actions の構成
Workflowを用意します。 キーポイントは3つです。
permissionsで、id-token: writeで書き込み権限が必要。permissions: write-allでもいいのですが、現状ではpermissionsを指定しないとうごかないので注意role-to-assume: ${{ secrets.AWS_ROLE_TO_ASSUME }}のsecrets.AWS_ROLE_TO_ASSUMEは、GitHub Secretに AWS_ROLE_TO_ASSUME という名前で先ほど作ったIAM RoleのArnを仕込んである。Arnのフォーマットは、今回の例ならarn:aws:iam::xxxxxxxxxxxxx:role/githubactions-oidc-roleというフォーマットになる- role-セッション-nameで、CloudTrailイベントにユーザー名が出るのでいい感じの名前にしましょう
uses: aws-actions/configure-aws-credentials@masterを指定する。uses: aws-actions/configure-aws-credentials@v1でないので注意してください
https://github.com/aws-actions/configure-aws-credentials/issues/302
name: aws oidc credential

on:
  workflow_dispatch:
  push:
    branches: ["main"]

# allow use id-token
permissions:
  id-token: write # required!
  contents: read

jobs:
  build:
    runs-on: ubuntu-latest
    steps:
      - uses: actions/checkout@v2
      - name: Configure AWS Credentials
        # must use "master", not "v1". v1 is not yet released to use latest role-to-assume.
        # Error: Credentials could not be loaded, please check your action inputs: Could not load credentials from any providers
        uses: aws-actions/configure-aws-credentials@master
        with:
          aws-region: ap-northeast-1
          role-to-assume: ${{ secrets.AWS_ROLE_TO_ASSUME }}
          role-session-name: GitHubActions-${{ github.run_id }}
          role-duration-seconds: 900 # minimum: 900sec, maximum: iam role session duration
      - name: get-caller-identity is allowed to run on role.
        run: aws sts get-caller-identity
実行してみると、冒頭のスクショのように成功するはずです。
$ aws sts get-caller-identity
{
    "UserId": "AROASJXUOK5UM7XZKRYTB:GitHubActions-1420393244",
    "Account": "***",
    "Arn": "arn:aws:sts::***:assumed-role/githubactions-oidc-role/GitHubActions-1420393244"
}
うまくできましたか? おめでとうございます!
ダメでした? 私も失敗を繰り返したので、経験したエラーと対処をFAQに載せておきます。
FAQ
GitHub Actionsで実行してみたら動作しない。
エラーメッセージ
Credentials could not be loaded, please check your action inputs: Could not load credentials from any providers
この場合、AWS OIDC Providerの設定がおかしいor GitHub Actionsのpermissionsが抜けています。
- (AWSの設定ミス) OIDC Providerのclient_id_listに
"sts.amazonaws.com"ではなく、リポジトリのURLを指定している。(古いブログ記事でそうなっている) - (GitHub Actions Workflowの設定ミス) Workflowで、permissionsがない。デフォルトのGitHub Actionsは
write-allのはずですが、まだid-tokensは含まれていない。明示的にpermissions: write-allを指定するか、id-token: writeを指定しましょう
GitHub Actionsで実行してみたら動作しない。
エラーメッセージ
Not authorized to perform sts:AssumeRoleWithWebIdentity
このケースは、OIDC Providerは問題なく、AssumeRoleの設定にミスがあります。
- (AWSの設定ミス) AssumeRoleのActionが
"Action": "sts:AssumeRoleWithWebIdentity"になっていない - (AWSの設定ミス) 複数リポジトリなのに
ForAnyValue:StringLikeではなくStringLikeで判定している - (AWSの設定ミス) AWSのIAM RoleのAssume Policyが設定しようとしているGitHub Owner/Repository:ブランチと内容と一致していない
過去にある類似記事との差分
GA前の内容で、結構ずれています。GA前の記事の内容でやると失敗するので注意です。(aws-actions/configure-aws-credentialsがv1でOIDC変更を反映すればいける)
https://dev.classmethod.jp/articles/github-actions-without-permanent-credential/